 ee
eeHow to Use a Stylus on a Tablet: Tips for Beginners
The first time I picked up a stylus and pressed it against my tablet screen, I honestly had no idea what I was doing — I just kind of jabbed at things and hoped for the best. But after a few weeks of practice, it completely changed the way I work and create on my device. If you're trying to figure out how to use a stylus on a tablet, you're in the right place, because the learning curve is a lot gentler than you might expect. Whether you're sketching, taking handwritten notes, or just trying to be more precise with your taps, a good stylus can genuinely transform the way you interact with your tablet every single day.
Contents
Getting Started: How to Use a Stylus on a Tablet
Before you can start drawing or writing, you need to make sure your stylus is actually ready to work with your specific device. The setup process varies quite a bit depending on whether you have an active stylus — one with electronics inside that communicates with the tablet — or a passive stylus, which is essentially a conductive rubber tip on a stick that mimics your finger's electrical signal. Active styluses typically offer features like pressure sensitivity (meaning the harder you press, the thicker or darker your line), while passive ones work straight out of the box on any capacitive touchscreen without any setup at all.
Pairing or Setting Up Your Stylus
If you have an active stylus like the Apple Pencil or Samsung S Pen, you'll want to go through a quick pairing process before you dive into anything creative:
- Apple Pencil (1st gen): Plug it into your iPad's Lightning port to pair. The 2nd gen model magnetically snaps to the side of compatible iPad Pro and iPad Air models.
- Samsung S Pen: On most Galaxy Tab models it slots directly into the device, and basic drawing works immediately — though Bluetooth features like Air Actions require a quick setup in Settings.
- Third-party active styluses: Most connect via Bluetooth. Open your tablet's Bluetooth settings, hold the stylus button to enter pairing mode, and select it from the available devices list.
- Passive styluses: Zero setup required — just pick it up and start tapping, since the conductive tip registers on any touchscreen just like a fingertip would.
Pro tip: After pairing your stylus, spend two minutes in your tablet's pen settings to enable palm rejection, which prevents your hand from accidentally making marks on the screen while you write or draw.
Calibrating and Adjusting Sensitivity
Once your stylus is connected, it's worth taking a few minutes to adjust the settings so that the feel matches the way you naturally hold a pen. On iPads, you'll find Apple Pencil settings under Settings → Apple Pencil, where you can adjust the double-tap action and pressure response. Samsung Galaxy Tab users can find S Pen customization under Settings → Advanced Features → S Pen, giving you control over writing hand preference, button shortcuts, and pointer behavior. Getting these adjustments right from the start will save you a lot of frustration and make the whole experience feel much more natural much faster.

Stylus Types and What You'll Actually Spend
One of the first decisions you'll face when learning how to use a stylus on a tablet is figuring out which type actually fits your needs and your budget, and the good news is that there are solid options at almost every price point. You don't necessarily need to spend a lot to get useful results for everyday tasks, though the premium options do offer meaningfully better performance for creative work.
Passive vs. Active Styluses
A passive stylus uses a conductive rubber or fiber tip that works exactly like a fingertip on any capacitive touchscreen — no battery, no pairing, no compatibility worries. They're inexpensive, universal, and perfectly fine for tapping around apps, signing forms, or light note-taking. An active stylus, by contrast, contains electronics that communicate directly with compatible tablet hardware, enabling pressure sensitivity (up to 4096 levels on premium models), tilt detection for shading, and palm rejection that lets your hand rest naturally on the screen without triggering accidental marks. If you're deciding which tablet platform to invest in before buying a stylus, our comparison of the iPad vs Samsung Galaxy Tab covers how each handles stylus input in detail.
Price Ranges by Category
| Stylus Type | Typical Price Range | Best For | Pressure Sensitivity |
|---|---|---|---|
| Passive / Universal | $5 – $20 | Casual tapping, basic navigation | No |
| Mid-range Active (3rd party) | $20 – $60 | Note-taking, light sketching | Basic / limited levels |
| High-end Active (3rd party) | $60 – $120 | Detailed illustration, annotation | Yes (up to 4096 levels) |
| Apple Pencil (2nd gen) | ~$129 | iPad power users, professional artists | Yes (4096 levels) |
| Samsung S Pen | Included with select Galaxy Tabs | Note-taking, sketching, Air Actions | Yes (4096 levels) |

When a Stylus Makes Sense (and When It Doesn't)
A stylus isn't a universal upgrade for everything you do on your tablet, and understanding when it genuinely helps versus when it just adds an extra step will save you a lot of frustration and keep the experience feeling natural rather than forced.
Tasks Where a Stylus Truly Helps
There are several scenarios where reaching for your stylus instead of your finger makes a real and noticeable difference in the quality of your work:
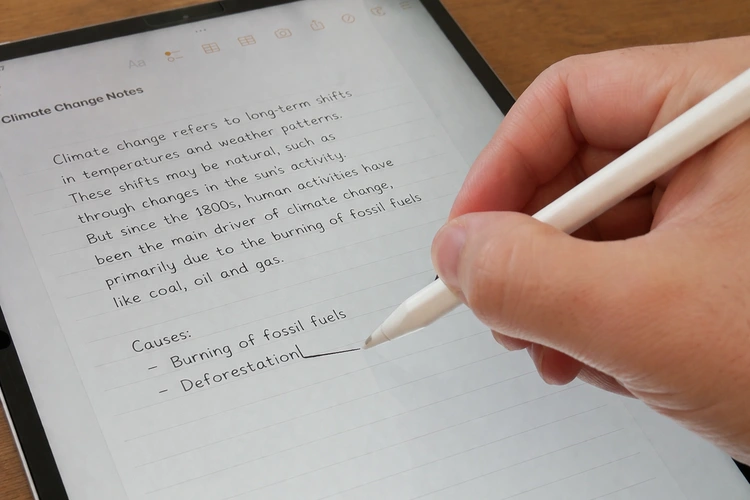
- Handwritten notes: Writing with a stylus feels far closer to pen and paper than typing, especially in apps like GoodNotes or Notability that convert handwriting cleanly and let you search it later.
- Sketching and illustration: Pressure sensitivity lets you vary line weight and build up shading in ways that a blunt fingertip simply can't replicate, giving your work a much more natural, expressive quality.
- Annotating PDFs and documents: Underlining, circling key passages, and adding margin comments is dramatically more precise and legible with a fine stylus tip than with your finger.
- Photo editing: Detailed retouching, masking selections, and dodging or burning specific areas of an image becomes far more controlled when you have a precise point to work with.
- Signing documents: A stylus lets you write your actual signature rather than a shaky finger-scrawl that looks nothing like the one on your ID.
Heads up: If your primary tablet activities are scrolling social media, streaming video, or typing messages, you probably won't reach for your stylus very often — and that's completely fine, because fingers are faster for those tasks anyway.
Times You're Better Off Using Your Finger
Your finger is actually faster and more intuitive for a lot of everyday tablet interactions that don't require precision, and switching to a stylus for these tasks can slow you down rather than help you. Swiping between apps, typing on the on-screen keyboard, pinch-zooming a map, tapping quick reply buttons, and scrolling through long pages all feel more fluid and responsive with a direct touch, so think of your stylus as a precision instrument you pick up deliberately when you need fine control — not as a permanent replacement for your hands in every situation.
Real Situations Where a Stylus Changes Everything
Sometimes the best way to understand how a tool works in practice is to see it in the hands of someone who actually uses it, so here are a few real-world scenarios where knowing how to use a stylus on a tablet genuinely pays off.
Students and Note-Takers
Students who write notes by hand tend to retain information more deeply than those who type — a pattern explored extensively in research on note-taking methods. A tablet and stylus combo gives you that cognitive benefit without the weight of carrying paper notebooks for every subject. You can write out math equations, draw concept diagrams, annotate lecture slides, and organize everything into searchable digital notebooks — all in a single device that fits in a bag. If you're still deciding between platforms before buying, our guide comparing iPad vs Android tablets walks through which ecosystem tends to work better for students and everyday users.
Artists and Designers
For anyone who draws, illustrates, or works with visual content professionally or as a hobby, a tablet and stylus setup is a surprisingly capable creative tool that fits in a backpack instead of a dedicated studio corner. Apps like Procreate on iPad, Samsung Notes on Galaxy Tab, and cross-platform tools like Adobe Fresco support the full range of pressure sensitivity levels, giving you control over stroke weight and texture that feels genuinely close to drawing on paper. If you want to present your work on a larger screen — during a client meeting, a classroom, or just for fun — see our walkthrough on how to connect a tablet to a projector for a quick and easy setup process.
Common Stylus Myths Worth Ignoring
There's a fair amount of misinformation floating around about styluses, and some of it might be holding you back from getting started or making a confident purchase decision, so let's clear up the most common ones quickly.
Myth: You Need an Expensive Stylus to Get Good Results
This one gets repeated constantly in tech forums, but it's not really accurate for the majority of users who are just getting started with a stylus for the first time. If you're taking handwritten notes, signing forms, or doing casual sketching, a $15–$30 passive or entry-level active stylus will genuinely serve you well without any major compromises. The premium price of something like the Apple Pencil 2nd generation is really justified when you're doing professional-grade illustration that demands ultra-low latency and the full 4096 pressure levels — not for annotating your grocery list or doodling in a meeting. Start affordable, see how much you actually use it, and then upgrade if your needs outgrow what you have.
Myth: Any Stylus Works With Any Tablet
This is only half-true, and the half that isn't true can cost you money if you buy without checking first. Any passive stylus will work on any capacitive touchscreen regardless of brand, because it's just mimicking a fingertip's electrical signal. But active styluses are built around proprietary communication protocols that only work with specific tablet hardware — the Apple Pencil is iPad-only, the Samsung S Pen only works with supported Galaxy Tab models, and Microsoft's Surface Pen is built for Surface devices. Before you add anything to your cart, always verify the compatibility list on the product page or packaging, because a quick check takes thirty seconds and avoids a return trip.
Apps and Accessories That Elevate Your Stylus Experience
Once you've got the basics down and you're comfortable with how to use a stylus on a tablet for your primary tasks, the right combination of apps and a few small accessories can make a surprisingly big difference in how smooth and enjoyable the whole workflow feels day to day.
Best Apps for Stylus Use
- GoodNotes 6: Excellent for handwritten notes, PDF annotation, and organizing notebooks into folders — works especially well with Apple Pencil on iPad.
- Notability: Note-taking with optional audio sync, so you can replay a recording and see what you were writing at that exact moment during a lecture or meeting.
- Procreate: The gold standard for digital illustration on iPad, with deep Apple Pencil support including full pressure sensitivity and tilt-based shading across hundreds of brush types.
- Samsung Notes: Built into Galaxy Tab devices with S Pen support, offering solid handwriting-to-text conversion, shape recognition, and PDF import.
- Adobe Fresco: A professional-grade painting and illustration app that combines live brushes, vector tools, and raster layers in an interface designed specifically for stylus input.
- Microsoft OneNote: A cross-platform note-taking option with solid stylus support on both iPad and Android tablets, useful if you already live in the Microsoft ecosystem.
Before you start filling your tablet with high-resolution art files and annotated PDFs, it's worth making sure you have enough breathing room in your storage. If things start feeling sluggish, our guide on how to free up storage space on a tablet covers practical steps you can take without deleting anything you actually need.
Accessories Worth Considering
A few inexpensive additions can noticeably improve your stylus experience without a significant investment:
- Matte screen protector: Adds a subtle paper-like texture to the glass surface that many stylus users strongly prefer over the slick, frictionless feel of bare glass, especially for long drawing sessions.
- Stylus tip replacements: The tip on your stylus wears down over time, particularly on glass or matte protectors, and replacing it when you notice reduced responsiveness or scratching sounds restores the feel instantly.
- Adjustable tablet stand: Drawing flat on a desk for extended periods puts strain on your wrist and neck — a stand that angles the screen at 30–45 degrees creates a far more comfortable working posture.
- Artist's glove liner: A single-finger or palm glove reduces friction between your hand and the screen, helps prevent accidental palm touches, and makes longer drawing sessions more comfortable overall.
It's also smart to back up your tablet before experimenting with new apps or settings, especially if you've been building up notes or artwork you'd hate to lose — our guide to backing up your tablet data walks through the simplest and most reliable methods clearly.
Frequently Asked Questions
Do I need a special tablet to use a stylus?
Any tablet with a capacitive touchscreen — which is essentially every modern tablet — will work with a passive stylus right out of the box. Active styluses with pressure sensitivity and palm rejection are more selective, since they require specific hardware support. Before buying an active stylus, check that your tablet model is listed as compatible on the manufacturer's product page.
Can I use an Apple Pencil on a Samsung tablet?
No — the Apple Pencil only works with compatible iPad models and uses Apple's proprietary communication protocol. Similarly, the Samsung S Pen is designed exclusively for supported Galaxy Tab and Galaxy Note devices. If you want cross-platform stylus options, look for third-party active styluses that explicitly list compatibility with both iOS and Android tablets.
How can I improve my handwriting with a stylus?
Start by adjusting your stylus's pressure sensitivity settings and making sure palm rejection is turned on so your hand can rest naturally on the screen. Practice in a dedicated app like GoodNotes or Notability rather than a general drawing app, since note-taking apps are optimized for handwriting feel and smoothness. Slowing down your strokes and using a matte screen protector for added texture can also make a noticeable difference in legibility fairly quickly.
Why does my stylus feel laggy or unresponsive?
Lag is most commonly caused by Bluetooth connectivity issues with active styluses — try unpairing and re-pairing, and make sure the battery isn't low. For passive styluses, a worn-down tip or a screen protector that's too thick can reduce responsiveness. Closing background apps and restarting your tablet can also help if the lag appears to be a system-level performance issue rather than a stylus hardware problem.
Is a stylus better than a finger for everyday tablet use?
It depends on what you're doing. For tasks that require precision — handwriting, drawing, annotating documents, photo editing, or signing forms — a stylus is clearly better than a finger. For general navigation, typing, scrolling, and most app interactions, your finger is faster and more natural. Most stylus users end up switching between the two depending on the task rather than committing exclusively to one.
Next Steps
- Check your tablet's settings right now to confirm whether it supports an active stylus natively, or whether you'll be shopping for a compatible third-party option that fits your budget.
- If you already own a stylus, open your tablet's pen or stylus settings and spend five minutes enabling palm rejection, adjusting pressure sensitivity, and customizing the button shortcuts to match the way you actually work.
- Download one of the recommended note-taking or drawing apps — GoodNotes, Notability, or Samsung Notes — and spend fifteen minutes just writing and doodling to get comfortable with the feel before jumping into real projects.
- Pick up a matte screen protector for your tablet model, since the added texture makes a noticeable difference in stylus control for writing and illustration, and they're inexpensive enough to try without much commitment.
- Back up your tablet data before installing new apps or making significant changes to your settings, so you have a clean restore point if anything goes sideways during your setup.
 |
 |
 |
 |

About Priya Anand
Priya Anand covers laptops, tablets, and mobile computing for Ceedo. She holds a bachelor degree in computer science from the University of Texas at Austin and has spent the last nine years writing reviews and buying guides for consumer electronics publications. Before joining Ceedo, Priya worked as a product analyst at a major retailer where she helped curate the laptop and tablet category. She has personally benchmarked more than 200 portable computers and is particularly interested in battery longevity, repairability, and the trade-offs between Windows, macOS, ChromeOS, and Android tablets. Outside of work, she runs a small Etsy shop selling laptop sleeves she sews herself.