 ee
eeBest Ways to Fix Windows Cannot Install Required Files in 2026
Few things are more frustrating than sitting down to install or upgrade Windows only to be stopped cold by an error message: windows cannot install required files. Whether you're setting up a new laptop, performing a clean install, or upgrading an existing system, this error can bring the entire process to a halt. The good news is that the underlying causes are almost always fixable — and most solutions require no special tools or technical expertise. This guide walks you through every proven method, from quick checks to deeper hardware diagnostics, so you can get your system running again as fast as possible.
If you're shopping for a new machine that's less prone to installation headaches, our laptops guide covers the most reliable options available today. And if you're a student or power user who needs a dependable workhorse, check out our picks for the best laptop for computer science students — all tested for stability under demanding workloads.

Contents
What Causes Windows Cannot Install Required Files?
The windows cannot install required files error is not a single problem — it's a symptom that can stem from a range of hardware and software issues. Understanding what triggers it helps you target the right fix instead of working through every solution blindly.
At its core, the error appears when the Windows Setup process tries to copy or decompress installation files onto your drive and something goes wrong. That "something" could be a corrupt installation medium, a failing RAM stick, an incompatible BIOS setting, insufficient disk space, or even a misbehaving USB port. The error is frequently accompanied by a specific error code — often 0x80070570, 0x800701B1, or 0xC0000005 — which narrows down the cause significantly.
According to Microsoft Support, file corruption during installation is one of the most reported Windows Setup issues, and the majority of cases are resolved through the steps outlined below.
Common Error Codes to Know
| Error Code | Most Likely Cause | First Step to Try |
|---|---|---|
| 0x80070570 | Corrupt installation file or bad RAM | Recreate installation media or reseat RAM |
| 0x800701B1 | USB drive not detected or driver issue | Switch USB port (try USB 2.0 instead of 3.0) |
| 0xC0000005 | Memory access violation, often RAM fault | Run MemTest86+ or swap RAM sticks |
| 0x8007025D | Corrupt ISO or bad download | Re-download ISO and verify checksum |
| 0x80070017 | Damaged disc or corrupted USB drive | Replace installation media entirely |
| 0xC1900101 | Driver incompatibility during upgrade | Disconnect peripherals, update BIOS |
Basic Fixes to Try First
Before diving into hardware diagnostics or system tools, run through these simpler checks. The majority of users who encounter windows cannot install required files resolve it at this stage.
Check Your Installation Media
A corrupted USB drive or ISO file is the single most common cause of this error. If you downloaded Windows from Microsoft's website and used the Media Creation Tool or Rufus to flash it to a drive, the process may have introduced file errors — especially if the download was interrupted or the drive was used heavily before.
- Re-download the ISO from Microsoft's official site and verify the SHA-256 checksum before flashing.
- Use a different USB drive. Cheap or old drives frequently fail mid-write without any obvious warning.
- Try a different USB port. Windows Setup sometimes has trouble with USB 3.0 ports. Plug your installation drive into a USB 2.0 port (usually the black ones) and try again.
- Use a different tool to create the media — if you used Rufus, try the Media Creation Tool, and vice versa.
Free Up Disk Space
Windows requires a minimum of 20 GB of free space for a clean install, but in practice you should have at least 40–50 GB available to account for the installation process itself, temporary files, and the initial update packages. If your target drive is nearly full, Setup may fail partway through when it runs out of room to expand compressed files.
Boot into a live environment or connect the drive to another computer and delete unnecessary files. If you're upgrading in place, use Disk Cleanup (search for it in Start) to remove temporary files and previous Windows installations before running Setup again.
Disconnect Non-Essential Peripherals
External devices — particularly older printers, drawing tablets, external hard drives, and USB hubs — can interfere with Windows Setup. Their drivers may conflict with the installation process or cause Setup to stall while looking for compatible modules.
Disconnect everything except your keyboard, mouse, and the installation drive. If you're using a laptop, remove any SD cards or connected docking stations. Then retry the installation from scratch. This simple step resolves the error surprisingly often, especially on systems with a lot of connected hardware.
Diagnosing and Fixing RAM Issues
RAM problems are behind a large proportion of windows cannot install required files errors — particularly error code 0x80070570 and 0xC0000005. When RAM is faulty or improperly seated, the system cannot reliably read and write the data needed to decompress and copy installation files, causing Setup to fail.
Reseat Your RAM Modules
On desktop PCs, RAM modules can work loose over time due to vibration or thermal expansion and contraction. Even on a machine that was working fine yesterday, a partially unseated stick can cause intermittent errors under the heavy read/write load of a Windows installation.
Power down completely and unplug from the wall. Open the side panel, press the retention clips to release each RAM stick, and remove them. Clean the gold contacts gently with a dry lint-free cloth, then firmly reseat each stick until the clips click. If you have two sticks and are still experiencing errors, try running with only one stick at a time — this helps identify whether a specific module is at fault.
Run MemTest86+
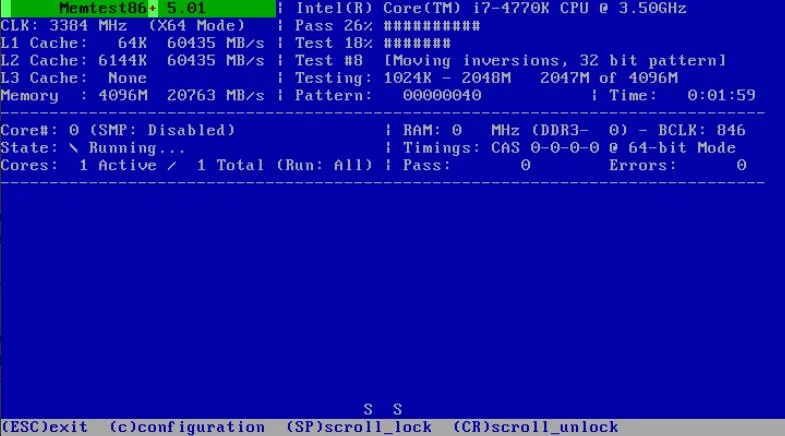
If reseating doesn't help, run a full memory diagnostic. MemTest86+ is the gold standard for RAM testing — it runs independently of Windows, directly from a bootable USB, and performs thorough pattern tests across your entire memory address space.
Download MemTest86+ from the official site, flash it to a USB drive, and boot from it. Let it run for at least two full passes — ideally overnight. A single error is enough to confirm faulty RAM. If MemTest finds errors, try removing one stick at a time to isolate the bad module. Replacing a failed stick is almost always enough to resolve the installation error entirely.
This kind of hardware reliability testing matters especially if you're running a machine that doubles as a workstation. For users who need a stable platform for demanding software, our guide to the best laptops for Adobe Premiere covers models with rigorously tested memory configurations.
BIOS Settings and Driver Conflicts
Even with good installation media and healthy RAM, BIOS misconfiguration or outdated firmware can prevent Windows Setup from completing successfully. This is especially common on older systems being upgraded to a newer version of Windows, or on custom-built desktops where BIOS defaults haven't been revisited since assembly.
Update or Reset Your BIOS
An outdated BIOS can cause compatibility issues with modern Windows installers, particularly around NVMe storage devices, TPM 2.0 requirements, and Secure Boot. Check your motherboard or laptop manufacturer's website for the latest BIOS version for your specific model, and follow their instructions to update it.
If you've made changes to your BIOS settings in the past, it's worth loading the Load Optimized Defaults option (sometimes called "Factory Defaults" or "Load Setup Defaults") before retrying installation. A single misconfigured setting — such as XMP memory profiles set too aggressively — can cause instability during the decompression phase of Setup.
Key BIOS checks before running Windows Setup:
- Set storage mode to AHCI (not IDE or RAID, unless your setup specifically requires it)
- Disable Fast Boot temporarily
- Disable Secure Boot if you're doing a clean install on a system that previously ran a different OS
- Ensure your boot order lists the USB installation drive first
- Disable any overclocking profiles (XMP, EXPO) and return memory to stock speeds
Storage Controller Mode
If your BIOS is set to RAID mode for the storage controller but you're installing on a single drive with no RAID array configured, Windows Setup may not be able to see the drive at all — or may fail while trying to write files to it. Switch the SATA/NVMe controller to AHCI mode in BIOS before running Setup.
Note that if Windows is already installed in RAID mode, switching to AHCI after the fact can prevent Windows from booting. This change should be made before installation, not after. If you need to switch an existing installation, Microsoft's support documentation covers a registry workaround that makes the transition safe.
Advanced Software and System Fixes
If you're seeing the windows cannot install required files error during an in-place upgrade rather than a clean install, there may be corruption in your existing Windows installation that is interfering with the upgrade process. These tools are built into Windows and are designed specifically for this scenario.
Run SFC and DISM
The System File Checker (SFC) and Deployment Image Servicing and Management (DISM) tools scan and repair corrupt system files without requiring you to reinstall Windows from scratch.
Open Command Prompt as Administrator and run these commands in order:
DISM /Online /Cleanup-Image /RestoreHealth
sfc /scannow
DISM connects to Windows Update to download replacement files for anything it finds corrupted, so you'll need an active internet connection. SFC then does a deeper scan of protected system files using the repaired image as a reference. After both complete, restart your PC and attempt the Windows installation or upgrade again.
For users experiencing driver-related errors (particularly around network adapters), our article on Realtek PCIe GBE Family Controller issues and fixes covers related driver conflicts that can surface during Windows upgrades.
Perform a Clean Boot Install
If an in-place upgrade keeps failing, third-party software running in the background may be the culprit. Security software, disk encryption tools, and system utilities can all interfere with Windows Setup by locking files or intercepting system calls.
Perform a clean boot to start Windows with the minimum required drivers and programs:
- Press Win + R, type
msconfig, and press Enter. - On the Services tab, check Hide all Microsoft services, then click Disable all.
- On the Startup tab, open Task Manager and disable all startup items.
- Restart your PC and attempt the installation again.
If Setup completes successfully in a clean boot environment, the issue is caused by one of the services or programs you disabled. Re-enable them in small groups and test each time to identify the specific culprit, then update or uninstall it before running Windows in normal mode.
Preventing the Error in the Future
Once you've resolved the immediate issue, a few habits will reduce the likelihood of running into windows cannot install required files again.
Keep dedicated installation media. Rather than using whatever USB drive is handy, keep a quality drive (32 GB, USB 3.0 from a reputable brand) specifically for OS installations. Recreate it fresh each time you need it to ensure the files are current and uncorrupted.
Test RAM periodically. RAM degradation is gradual and often invisible until a failure-inducing task — like a Windows installation — pushes it over the edge. Running MemTest86+ annually on any machine you rely on for work is good preventative maintenance.
Keep BIOS updated. Motherboard and laptop manufacturers regularly release BIOS updates that improve hardware compatibility and stability. Check for updates before any major Windows installation or upgrade, not just when something goes wrong.
Back up before upgrading. A failed Windows installation rarely corrupts existing data, but it can in edge cases — especially if a failure occurs during a partition operation. Always have a current backup before any major system change.
Choose reliable hardware. Installation errors are significantly more common on aging or budget hardware where RAM is marginal, storage is failing, or firmware is outdated. If you're regularly building or deploying Windows systems, investing in hardware with good reliability track records pays off over time. Our review of the best fanless and silent laptops highlights models built with long-term stability in mind.
Frequently Asked Questions
What does "windows cannot install required files" mean?
It means the Windows Setup process was unable to copy or decompress one or more files needed to complete the installation. The cause can range from a corrupt USB installation drive to faulty RAM, insufficient disk space, or a BIOS misconfiguration. Checking the accompanying error code (such as 0x80070570) helps identify the specific cause.
Is error code 0x80070570 always caused by bad RAM?
Not always, though bad or improperly seated RAM is a very common cause. Error code 0x80070570 can also be triggered by a corrupt ISO file, a failing USB drive, or file system errors on the target drive. Start by recreating your installation media before moving on to RAM testing.
Can I fix this error without reinstalling Windows?
If you're seeing the error during an in-place upgrade rather than a clean install, yes — running DISM and SFC from an existing Windows installation can often repair the corrupt system files causing the upgrade to fail. These tools are available from an elevated Command Prompt without any reinstallation.
Why does switching to a USB 2.0 port fix the installation error?
Some older BIOS versions and chipsets have incomplete or buggy USB 3.0 support in the pre-OS environment, causing data transfer errors during installation. A USB 2.0 port uses simpler, more universally supported protocols, which eliminates this potential source of file corruption during setup.
Do I need to update my BIOS before installing Windows?
It's not always required, but it's strongly recommended — especially if your system is more than a few years old or if you're installing a newer version of Windows. BIOS updates often include improved hardware compatibility, TPM support fixes, and storage controller updates that can prevent installation errors.
How long does MemTest86+ need to run to reliably detect bad RAM?
At minimum, two full passes — which can take anywhere from one to four hours depending on how much RAM your system has. For the most reliable results, running MemTest86+ overnight (four or more passes) is recommended. A single error reported during any pass is sufficient to confirm faulty RAM.
 |
 |
 |
 |

About Priya Anand
Priya Anand covers laptops, tablets, and mobile computing for Ceedo. She holds a bachelor degree in computer science from the University of Texas at Austin and has spent the last nine years writing reviews and buying guides for consumer electronics publications. Before joining Ceedo, Priya worked as a product analyst at a major retailer where she helped curate the laptop and tablet category. She has personally benchmarked more than 200 portable computers and is particularly interested in battery longevity, repairability, and the trade-offs between Windows, macOS, ChromeOS, and Android tablets. Outside of work, she runs a small Etsy shop selling laptop sleeves she sews herself.